|
These pages document my creation of a ferrocement garage/storage building on my land in Hawai'i. Please
contact
me if you are interested in my ferrocement teaching/consulting services. For additional online information on ferrocement I suggest starting with a visit to ferrocement.net.
![[front view of completed building with doors ajar]](/images/hifcimages/small/hifcbuilding14.frdonedooropen.jpg)
|
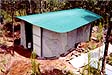
Though I generally prefer less industrial materials than steel, cement and concrete, after considerable deliberation and research the main attributes of ferrocement seemed the best overall match for my project parameters in this particular case. This was to be a utility building in a humid tropical climate, built entirely by hand, almost entirely without power tools, with no grid power and no water (other than tropical rainfall and what I'd bring in jugs from elsewhere) available on the building site.
|
|
I chose to use ferrocement for the shell of the structure for several primary reasons: it is durable in humid tropical climates (very resistant to rot, mildew, termites and other organic-matter-eating critters), has low up-front materials costs, can be built by hand with relatively few and relatively simple tools, and can be shaped creatively and sculpturally to suit site and design considerations.
|
![[view of completed building from rear quarter]](/images/hifcimages/small/hifcbuilding15.rdonedooropen.jpg)
|
![[mesh being applied to rebar and wire skeleton]](/images/hifcimages/small/1.q.mesh3.jpg)
|
I wanted to build the structure with minimum disruption to surrounding terrain and vegetation. The curvaceous properties of hand-built ferrocment enabled me to use the maximum space available for the building shell without having to take out any of the lovely 'ohia trees growing close to the wall on the West side (though I did prune a few small lower limbs). Also, the curves in the walls and corners greatly increase the strength of the structure compared to straight lines and sharp corners.
|
|
Originally I had planned to also build the roof using ferrocement. As the walls progressed and I contemplated roof fabrication, I realized I did not know enough about the properties of the material to insure success with a self-supporting hand-built roof this large. I also realized I was quite ready to not tie any more wires or mix any more plaster for a while, not to mention the necessary upside-down and overhead plastering! Thus I opted for a metal roof surface with wood stringer and batten framing, enabling me to retain close to my original asymmetrical arched roof design.
|
![[stringer and batten roof framing nearly complete]](/images/hifcimages/small/3.q.battens2.rearquarter.jpg)
|
I plan to experiment with smaller ferrocement roof structures, including using a ferrocement surface as the basis for a "living roof" system. If you have experience with ferrocement under a living roof I'd appreciate any information you're willing to share.
The following pages show and tell most of the major steps in building the structure. The final page has assorted details not covered in the brief paragraphs accompanying the pictures - information on tools, techniques, mistakes harvested, design process narrative, etc.. Please - continue on!
|


![[front view of completed building with doors ajar]](/images/hifcimages/large/hifcbuilding14.frdonedooropen.jpg)
![[view of completed building from rear quarter]](/images/hifcimages/large/hifcbuilding15.rdonedooropen.jpg)
![[mesh being applied to rebar and wire skeleton]](/images/hifcimages/large/1.q.mesh3.jpg)
![[stringer and batten roof framing nearly complete]](/images/hifcimages/large/3.q.battens2.rearquarter.jpg)